
Are you looking to add a truly special touch to your next celebration, perhaps a birthday or a family get-together? Store-bought decorations can be fine, but there's something genuinely delightful about creations made with your own hands. Think about it, a little bit of your effort can make a huge difference, transforming simple treats into memorable works of art. This guide is all about showing you how to create wonderful homemade cupcake decorations, bringing a personal flair to any event.
Making your own cupcake toppers isn't just about saving a few dollars, though that's certainly a nice perk. It's also about expressing your creativity and making something unique that no one else will have. Just like when you tackle a home improvement project or fix something around the house yourself, there's a real sense of accomplishment, and a bit of fun, that comes from a DIY project. It's a bit like those electronics projects where you build something from scratch; the happiness comes from the making itself, you know?
From simple paper cutouts to more elaborate designs, the possibilities are nearly endless when it comes to personalizing your cupcakes. You can match any party theme, add inside jokes, or simply make something beautiful just because. This approach, you see, lets you really put your stamp on things, much like when you make your own inground pool covers instead of buying them. It's about bringing your vision to life, and that, in a way, is what DIY is all about.
Table of Contents
- Why DIY Cupcake Toppers?
- Gathering Your Creative Supplies
- Simple Topper Ideas to Get You Started
- Step-by-Step Guide for Basic Paper Toppers
- Making It Personal: Theme Ideas
- Tips for a Smooth DIY Experience
- Frequently Asked Questions About DIY Cupcake Toppers
- Your Next DIY Adventure
Why DIY Cupcake Toppers?
Choosing to make your own cupcake toppers offers a lot of advantages, really. For starters, it's often much kinder to your wallet. Buying custom toppers can add up quickly, especially for larger gatherings. Doing it yourself means you control the costs, often using materials you already have or can get for very little money, so that's a plus.
Beyond the savings, there's the incredible freedom of personalization. When you make them yourself, you're not limited to what's available in stores. You can create toppers that perfectly match your party's specific theme, color scheme, or even incorporate inside jokes or special messages. It's a bit like making your own butterfly house; you can truly make it your own, rather than just picking one off a shelf.
And then there's the sheer joy of the creative process. For many, the act of making something with their hands is incredibly satisfying. It's a fun activity you can do alone, or even with kids, making it a shared experience. It really does help if you have someone to work with you, like when you're blowing insulation into existing walls, but it can be done alone too, which is great.
Gathering Your Creative Supplies
Before you begin your cupcake topper adventure, it's a good idea to gather all your materials. Having everything ready makes the process smoother and more enjoyable, you know? It's like preparing for any home repair project; you wouldn't start without your tools, would you?
Basic Materials You'll Need
For most simple DIY cupcake toppers, you'll want to have these items on hand. They are pretty common, so you might even have some of them already. That, is that a good thing.
- Cardstock or Craft Paper: This is your main base. Choose various colors and patterns that fit your theme.
- Scissors: A sharp pair is essential for clean cuts.
- Craft Glue or Hot Glue Gun: For attaching different pieces together. A hot glue gun works quickly, but craft glue gives you more time to adjust.
- Toothpicks or Small Wooden Skewers: These will be the sticks that hold your toppers upright in the cupcakes.
- Pencil and Eraser: For sketching designs before cutting.
Optional Tools for Extra Flair
To really step up your game and create more intricate designs, consider adding some of these to your collection. They can make things a bit easier, too, and allow for more creative freedom.
- Craft Punches: These come in all sorts of shapes like circles, stars, hearts, and even more detailed designs. They make quick work of repetitive shapes.
- Cutting Machine (e.g., Cricut, Silhouette): If you're serious about crafting, a machine like this can cut incredibly intricate designs from paper, vinyl, and more. It's a bit of an investment, but can save a lot of time for larger batches.
- Glitter, Stickers, Rhinestones: For adding sparkle and dimension.
- Food-Safe Markers or Edible Ink Pens: If you plan to draw directly on edible elements like fondant or wafers.
- Small Paintbrushes and Paints: For hand-painted details on paper or edible surfaces.
- Double-Sided Tape: A clean alternative to glue for some applications.
Simple Topper Ideas to Get You Started
Now that you have your supplies, let's explore some easy and fun ideas for your diy cupcake toppers. These suggestions are just a starting point, so feel free to let your imagination run wild, you know? It's really about having fun with it.
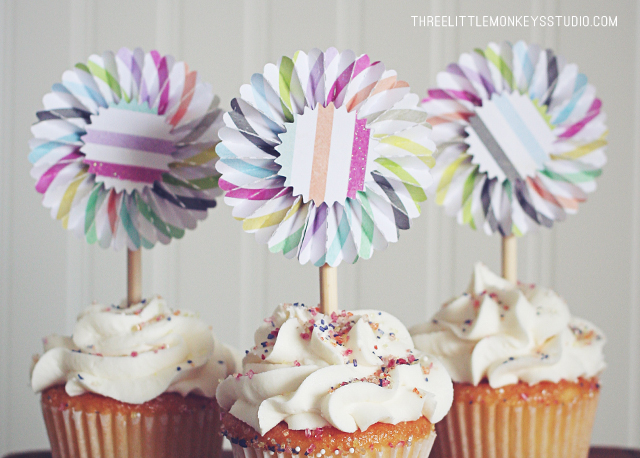
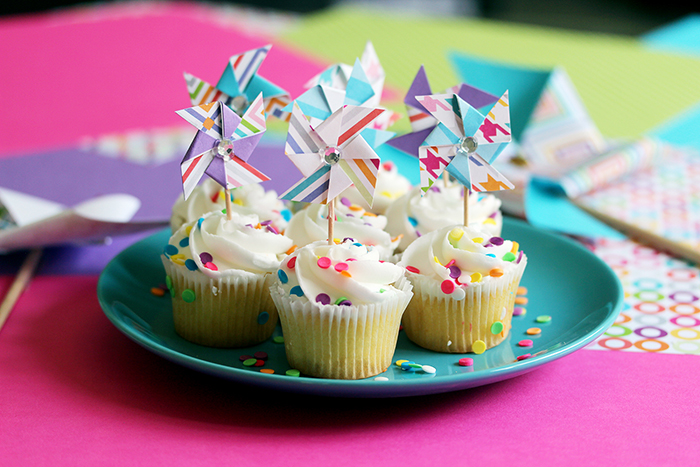
Paper Power: Easy Cutouts
Paper is perhaps the most versatile and accessible material for cupcake toppers. You can do so much with it, honestly. From simple shapes to layered designs, paper offers endless possibilities.
- Basic Shapes: Cut out circles, squares, stars, or hearts from colorful cardstock. You can layer two different colors for a nice effect, too.
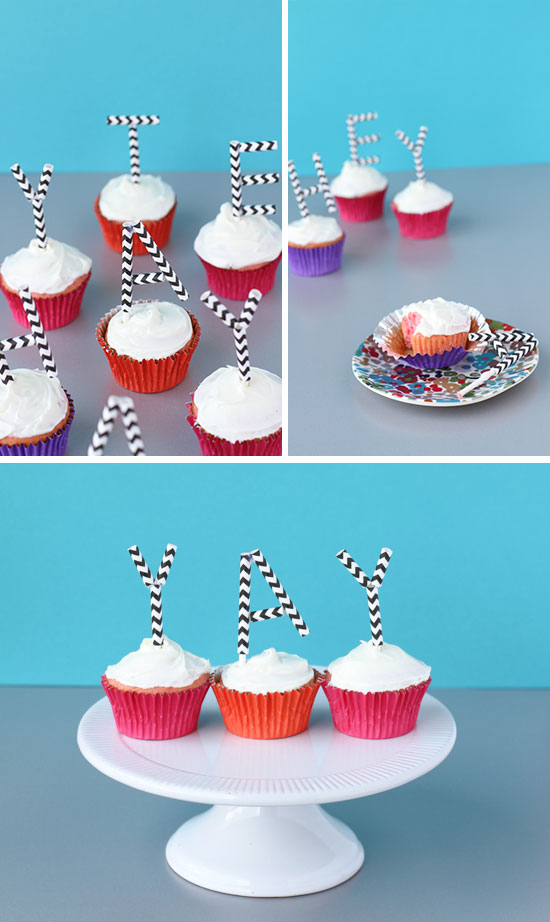
- Themed Silhouettes: For a birthday party, cut out numbers representing the age, or letters to spell a name. For a baby shower, tiny onesies or baby bottles work well.
- Printed Designs: Find free printable templates online, print them on cardstock, and then cut them out. This is a very quick way to get detailed designs without drawing.
- Mini Banners: Cut out tiny flag shapes, write one letter on each, and string them together with thin thread between two toothpicks. This makes a charming little banner, it really does.
Fabric Fun: Tiny Flags
Fabric scraps can add a lovely texture and a rustic or whimsical feel to your toppers. This is a bit different, but it can look really good.
- Scrap Fabric Flags: Cut small triangles or rectangles from patterned fabric scraps. Fold them over a toothpick and secure with a dab of hot glue.
- Ribbon Bows: Tie tiny bows from thin ribbon and glue them to the top of a toothpick. These are rather elegant, too.
- Felt Shapes: Felt is easy to cut and doesn't fray. Cut out small felt shapes like clouds, animals, or flowers and glue them to toothpicks.
Edible Elegance: Sweet Designs
For a truly integrated look, why not make the toppers edible? This is a bit more involved, but the results are amazing, honestly.
- Fondant Shapes: Roll out fondant (a type of sugar paste) and use cookie cutters or a knife to cut out shapes. You can color the fondant with food coloring. Let them dry a bit before placing them on the cupcakes.
- Chocolate Molds: Melt chocolate and pour it into small candy molds. Once set, you can gently pop them out and place them on top of your cupcakes.
- Wafer Paper Designs: Wafer paper is an edible paper that can be printed on with edible ink. You can cut out intricate designs or even photos.
- Fruit Skewers: For a healthier option, thread small pieces of colorful fruit onto mini skewers. These are refreshing and look pretty, too.
Step-by-Step Guide for Basic Paper Toppers
Let's walk through making a simple, yet effective, paper cupcake topper. This method is very beginner-friendly, and you can adapt it for many different designs. It's almost like a basic home repair, where you follow a few steps to get a good result.
1. Choose Your Design: Decide on the shape or image you want for your topper. For a first try, simple shapes like circles, stars, or hearts are great. You could also choose a simple image like a balloon or a small animal. Consider the size; you want it to be noticeable but not overwhelm the cupcake, so keep it in mind.
2. Prepare Your Paper: Select your cardstock or craft paper. If you're using a template, trace it onto the paper with a pencil. If you're freehanding, sketch your design lightly. Remember, you can always erase and refine your drawing, you know?
3. Cut Out Your Shapes: Carefully cut out your designs using sharp scissors. For more intricate shapes, take your time and make small, precise cuts. If you have craft punches, now is the time to use them for perfect, consistent shapes. This step is where a steady hand helps, truly.
4. Add Details (Optional): This is where you can make your topper truly unique. Add glitter, stickers, or draw on extra details with markers. You could even layer different colored paper cutouts to create a multi-dimensional effect. For instance, a smaller heart on top of a larger one. This part is pretty fun, actually.
5. Attach the Stick: Take a toothpick or small wooden skewer. Apply a small dot of craft glue or a line of hot glue to one end of the stick. Position the stick on the back of your paper design, making sure it's centered and not poking out too much at the top. If you're using hot glue, it will set very quickly, so be ready. For craft glue, you might need to hold it for a few seconds. You want it to be secure, obviously.
6. Let It Dry: If you used craft glue, allow enough time for the glue to dry completely before handling the toppers. This prevents them from falling apart when you place them in the cupcakes. Hot glue dries almost instantly, which is convenient, so that's a nice benefit.
7. Repeat: Continue making as many toppers as you need for your cupcakes. Once you get into a rhythm, it goes pretty fast. It's kind of satisfying to see a pile of finished toppers, honestly.
Making It Personal: Theme Ideas
The beauty of diy cupcake toppers is how easily they adapt to any theme. Think about the occasion and the person you're celebrating. This is where your creativity can really shine, you know?
- Birthday Bashes: Numbers, age-appropriate characters, tiny party hats, balloons, or even mini photos of the birthday person. For a child's party, their favorite animal or superhero emblem would be a hit.
- Baby Showers: Little storks, baby bottles, pacifiers, tiny footprints, or "It's a Boy/Girl" banners. Soft pastel colors work wonderfully here, typically.
- Weddings/Anniversaries: Monograms of the couple's initials, tiny hearts, doves, or even miniature wedding bells. Gold or silver accents can add a touch of elegance, too.
- Holidays: For Christmas, think mini snowflakes or Santa hats. For Halloween, tiny ghosts or pumpkins. Valentine's Day means hearts, of course.
- Seasonal Celebrations: Spring flowers, summer suns, autumn leaves, or winter snowflakes. These are very versatile, really.
- Hobby/Interest Focused: If the person loves music, make tiny musical notes. If they're into gardening, small gardening tools or flowers. For someone who loves electronics, maybe a tiny circuit board design, which is pretty cool, if you ask me. Learn more about DIY projects on our site, there's always something new to try.
Tips for a Smooth DIY Experience
Making your own cupcake toppers should be fun, not frustrating. Here are a few pointers to help everything go smoothly. These are pretty useful, in a way.
- Start Simple: If you're new to crafting, begin with easy designs. Don't try to make a super intricate 3D topper on your first go. You can always try more complex things later, you know?
- Work in Batches: Cut all your shapes first, then do all your gluing. This makes the process more efficient. It's like an assembly line, basically.
- Use a Good Workspace: Clear off a table and protect it with newspaper or a craft mat. This keeps your work area tidy and prevents glue from getting everywhere.
- Safety First: If using a hot glue gun, be careful not to burn yourself. Supervise children closely if they are helping.
- Don't Be Afraid to Experiment: Try different materials, colors, and techniques. Some of the best ideas come from just playing around. It's all about having fun, truly. You might find a new favorite method. You can also link to this page for more crafting ideas.
- Reference Other DIY Projects: The skills you pick up here, like precise cutting or careful gluing, are useful in many other DIY areas, like home repair or even building a pump house to protect your water pump. It's all about making things yourself, which is very rewarding.
Frequently Asked Questions About DIY Cupcake Toppers
People often have questions when starting a new DIY project, and making cupcake toppers is no different. Here are some common things people wonder about, you know?
Can I use regular paper instead of cardstock?
While you can use regular paper, cardstock is much better. Regular paper is too flimsy and will likely flop over or get soggy in the cupcake. Cardstock holds its shape well and looks more professional, so it's worth getting, honestly.
How far in advance can I make cupcake toppers?
Most paper or fabric cupcake toppers can be made weeks or even months in advance. Store them flat in an airtight container away from moisture and direct sunlight. Edible toppers, like fondant or chocolate, depend on the material; some can be made ahead, while others are best done closer to the event. Always check storage recommendations for edible items, you know, just to be safe.
What's the best way to make them food-safe?
If your toppers are not edible, make sure the part that goes into the cupcake is a food-safe material, like a clean toothpick or skewer. You can also wrap the bottom of the toothpick with a small piece of plastic wrap before inserting it into the cupcake, which is a good idea. This keeps the paper or glue from touching the food directly, which is important, obviously.
Your Next DIY Adventure
Creating your own diy cupcake toppers is a fantastic way to add a personal and charming element to any celebration. It's a project that's accessible to almost anyone, regardless of their crafting experience. The satisfaction of seeing your handmade creations adorning delicious treats is truly rewarding, you know? It's a bit like the feeling you get after completing any home improvement or repair project, like fixing some plumbing or electrical issues yourself. There's a real sense of accomplishment there, and a lot of joy, too.
So, gather your materials, pick a design, and let your creativity flow. You'll be amazed at what you can make with just a few simple items and a little bit of time. The best part is, you're not just making decorations; you're making memories. And that, in a way, is the true spirit of DIY. For more general crafting supplies and ideas, you might find inspiration at a site like Instructables, which has a lot of great projects, too.
Detail Author:
- Name : Elmo Anderson
- Username : rosenbaum.sandra
- Email : carolyn04@homenick.com
- Birthdate : 1976-02-29
- Address : 9660 Greenholt Trafficway New Guillermoborough, AK 80408
- Phone : +1-980-255-2611
- Company : Lang Group
- Job : Alteration Tailor
- Bio : Esse pariatur ea facilis ex et. Ex ut molestias aperiam eaque praesentium. Non quos possimus at praesentium. Laborum eligendi aut sit harum accusamus itaque. Dolore dolor illo quis aut et architecto.
Socials
linkedin:
- url : https://linkedin.com/in/kaya_olson
- username : kaya_olson
- bio : Illo quia deleniti autem repudiandae.
- followers : 6188
- following : 672
tiktok:
- url : https://tiktok.com/@olsonk
- username : olsonk
- bio : Et iure totam deserunt amet eos fugit. Molestiae aut ad dolor aspernatur.
- followers : 4885
- following : 1001
instagram:
- url : https://instagram.com/kaya_olson
- username : kaya_olson
- bio : Enim voluptatibus in placeat magnam incidunt vero. Laborum optio ducimus incidunt.
- followers : 251
- following : 2915
