
Do you have a small computer, perhaps a Raspberry Pi, sitting somewhere, maybe hooked up to a screen, and you wish you could get to it from another spot in your home or even far away? It's a common thought, you know, for many people who use these clever little devices. Whether your Raspberry Pi is doing something important in a small business, helping out a kitchen table tinkerer, or even teaching a classroom coder, having easy access to it can make a big difference, in a way. This is where getting remote access comes in, and the good news is that you can often do it for absolutely no money, which is pretty neat.
Being able to control your Raspberry Pi from a distance opens up a lot of possibilities, as a matter of fact. You might want to check on a project, run some code, or just see what your Pi is up to without needing to plug in a monitor, keyboard, and mouse every single time. It saves you time, it saves you effort, and it gives you a lot more freedom with how you use your tiny computer. This guide will walk you through how to set up remote access using SSH, a way to connect securely, and it won't cost you anything, so that's a plus.
The Raspberry Pi Foundation, you see, makes computing available and budget-friendly for just about everyone. They even provide online coding resources and challenges that are free for anyone, anywhere, which is truly helpful. This focus on making things accessible and free extends to how you can manage your Raspberry Pi, too. Getting your Raspberry Pi ready for free remote access is a pretty straightforward process, and we'll show you how to do it using SSH, which is a very standard method for this kind of thing, actually.
Table of Contents
- What is SSH and Why is it Good for Your Raspberry Pi?
- Getting Your Raspberry Pi Ready for SSH
- Connecting to Your Raspberry Pi from Another Computer
- Making Your Remote Connection More Secure
- Accessing Your Raspberry Pi from Outside Your Home Network
- Common Questions About Raspberry Pi Remote Access
What is SSH and Why is it Good for Your Raspberry Pi?
SSH, which stands for Secure Shell, is a way to connect to another computer over a network, and it's quite a secure method, too. Think of it like having a secret, protected tunnel directly to your Raspberry Pi. When you use SSH, all the information you send back and forth, like your commands or any data, is scrambled up, so others can't easily see it. This makes it a really safe choice for getting to your Raspberry Pi from somewhere else, which is very important for privacy and security, as you might imagine.
For your Raspberry Pi, SSH is just perfect, you know. It lets you type commands as if you were sitting right in front of your Pi, even if you're across the room or across the country. You can run programs, change settings, move files around, and do pretty much anything you'd do with a keyboard and monitor directly attached. And the best part? The software you need for SSH is already built into most operating systems, and it's free to use, which is a really good deal.
The Raspberry Pi Foundation, for instance, encourages learning and building, and having free remote access through SSH fits right into that idea. It means you can work on your exciting physical computing projects or write powerful programs from any computer, anywhere, without needing to move your Pi around, which is quite convenient. This sort of flexibility is a big win for everyone, from those learning coding for kids to young adults taking an online computing class in Python, so it's a valuable tool.
Getting Your Raspberry Pi Ready for SSH
Before you can connect to your Raspberry Pi using SSH, you need to make sure it's set up correctly, you know. This usually involves putting the operating system on a memory card and then telling your Pi to allow SSH connections. It's a pretty simple process, actually, and it doesn't take very long to get through these first steps, which is nice.
Installing Raspberry Pi OS
The very first thing you need is the Raspberry Pi operating system on a microSD card, as a matter of fact. The Raspberry Pi Imager tool makes this incredibly quick and easy. You just download the Imager, pick your Pi's operating system, and then choose your microSD card. The Imager does all the hard work for you, preparing the card so it's ready to use with your Raspberry Pi, which is quite helpful.
This Imager tool is provided for free by the Raspberry Pi Foundation, which really goes to show their commitment to making computing accessible. You can get it from their official documentation pages, and it works on Windows, macOS, and Linux computers, so it's quite versatile. Once the operating system is on your card, you just pop it into your Pi, and you're almost ready to go, which is a pretty good start.
Enabling SSH on Your Pi
There are a few ways to turn on SSH on your Raspberry Pi, you know. One simple way, if you have a monitor and keyboard connected, is to go into the Raspberry Pi Configuration tool, which is under the Preferences menu. From there, you just go to the Interfaces tab and make sure SSH is set to "Enabled." This is a pretty direct method, and it works well if you're setting up your Pi for the first time with a screen.
Another way, which is super useful if you're setting up a "headless" Pi (meaning no monitor or keyboard attached), is to create an empty file named `ssh` (with no file extension) in the boot partition of your microSD card after you've put the OS on it with the Imager. When your Raspberry Pi starts up, it looks for this file and, if it finds it, it automatically turns on SSH for you. This is a clever trick for remote setups, and it saves you a lot of hassle, honestly.
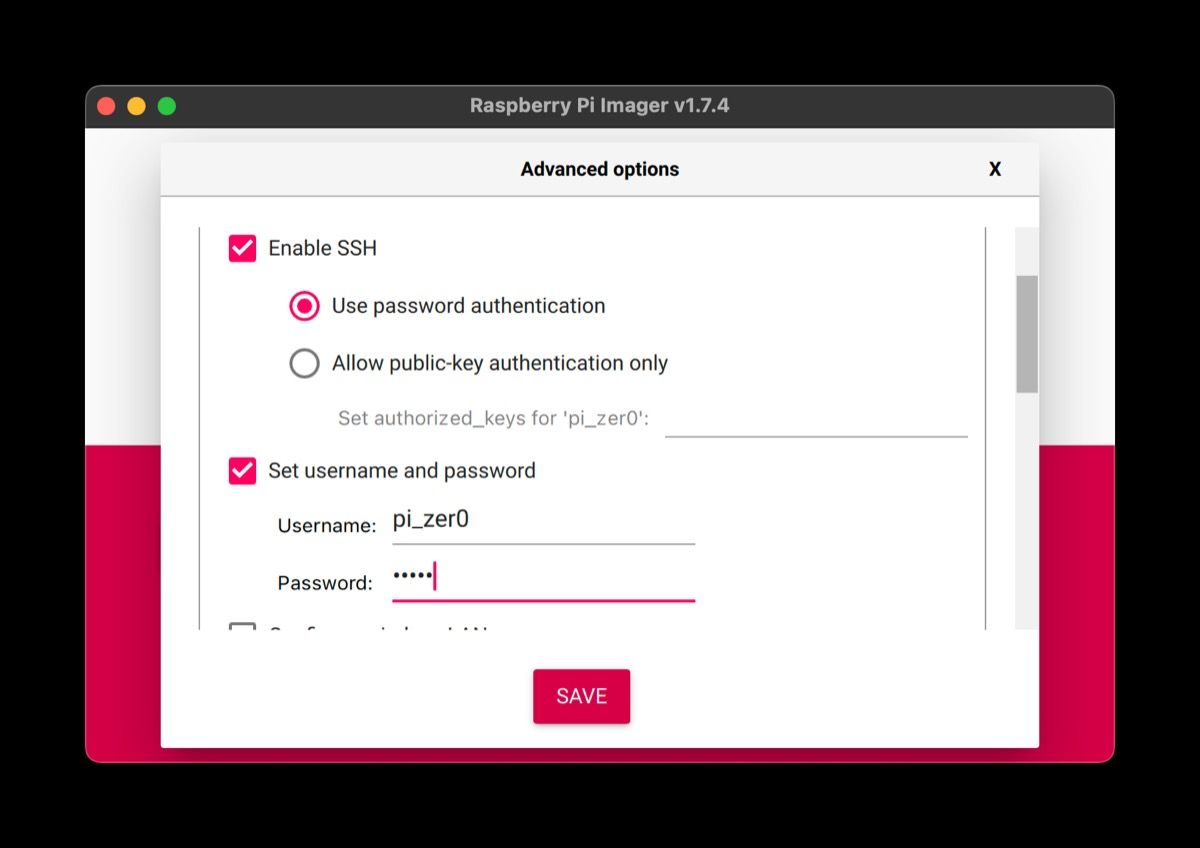
A newer and quite convenient method, which is pretty much available now, involves using the Raspberry Pi Imager itself to pre-configure SSH. Before you write the OS to your microSD card, you can click on a little gear icon or press Ctrl+Shift+X. This brings up advanced options where you can enable SSH, set a username and password, and even configure Wi-Fi. This saves you a lot of steps later, and it's very handy for getting your Pi ready for remote access right from the start, so that's a nice feature.
Connecting to Your Raspberry Pi from Another Computer
Once SSH is turned on on your Raspberry Pi, you're ready to make that connection from another computer, you know. This is where the magic happens, and you'll see how easy it is to control your Pi without being physically next to it. It's a pretty satisfying moment when that connection works, as a matter of fact.
Finding Your Pi's Network Address
To connect, you need to know your Raspberry Pi's network address, also known as its IP address, in a way. If you have a monitor connected to your Pi, you can open a terminal window and type `hostname -I`. This command will show you the IP address your Pi is using on your local network. It's usually a series of numbers separated by dots, like `192.168.1.100`, for example.
If your Pi is headless, you might need to check your router's administration page. Most routers have a section that lists all the devices connected to your network, and you can usually find your Raspberry Pi listed there by its hostname, which often starts with "raspberrypi." This method is very common for finding devices on your home network, and it's quite effective, too. You can also use network scanning tools, which are sometimes free, to find your Pi's address, so that's another option.
Using SSH on Windows, Mac, or Linux
Connecting via SSH is pretty much the same across different operating systems, you know. If you're using a Mac or a Linux computer, you already have a terminal application built in. You just open it up and type a simple command. For Windows users, the process is now much easier, as Windows 10 and 11 include an SSH client right out of the box, which is really convenient.
Here's the basic command you'll use in your terminal or command prompt:
ssh pi@your_pi_ip_addressReplace `your_pi_ip_address` with the actual IP address you found for your Raspberry Pi. The `pi` part is the default username for Raspberry Pi OS, so that's what you'll use initially. When you run this command for the first time, you might get a message asking if you want to continue connecting. Just type `yes` and press Enter. Then, it will ask for your password. Type in the password for your Pi (the default is usually `raspberry`), and you won't see the characters as you type, which is normal for security. Press Enter, and if everything is correct, you'll be logged into your Raspberry Pi's command line, which is pretty cool.
From here, you can start typing commands just like you would if you were sitting right at your Pi. You could, for instance, update your system by typing `sudo apt update` and then `sudo apt upgrade`. You could run a Python script you've written, or even install new software. It's a very powerful way to interact with your Pi remotely, and it's completely free, which is great for anyone, like those learning to code or building exciting projects with the Raspberry Pi Foundation's resources.
Making Your Remote Connection More Secure
While SSH is secure by its nature, there are steps you should take to make your connection even safer, you know. Especially if you plan to access your Raspberry Pi from outside your home network, these extra security measures are very important. It's all about protecting your little computer and the projects it's working on, so it's worth the small effort.
Changing Your Default Password
This is probably the most important step you can take, honestly. The default username `pi` and password `raspberry` are widely known. If you don't change them, anyone who knows your Pi's IP address could potentially get in. To change your password, once you're logged into your Pi via SSH, just type `passwd` and press Enter. It will ask for your current password, and then you'll enter your new password twice. Make sure your new password is strong, meaning it's long and includes a mix of different types of characters. This is a very simple but effective security improvement, as a matter of fact.
Using SSH Keys for Better Security
For even stronger security, you can use SSH keys instead of passwords, you know. This involves creating a pair of special cryptographic keys: a public key and a private key. You put the public key on your Raspberry Pi, and you keep the private key safe on your local computer. When you try to connect, your local computer sends a request to your Pi, and they use these keys to verify each other's identity. It's like having a very complex digital handshake that's nearly impossible to fake.
Setting up SSH keys might seem a little more involved at first, but it's much more secure than using just a password, and it can also be more convenient because you don't have to type your password every time. Many expert educators who teach about Raspberry Pi and digital skills often recommend this method for good reason. There are many free guides online that walk you through generating SSH keys and adding them to your Pi, which is quite helpful, so that's a good place to start.
Accessing Your Raspberry Pi from Outside Your Home Network
Connecting to your Raspberry Pi from inside your home network is one thing, but what if you want to get to it when you're at a coffee shop or a friend's house, you know? This is where things get a little more complex, but it's definitely possible, and you can still do it for free. It opens up a whole new level of freedom for your projects, which is very exciting.
Understanding Port Forwarding
To access your Pi from outside your home, you typically need to set up something called "port forwarding" on your home router, as a matter of fact. Think of your router as a doorman for your home network. When a request comes from the internet looking for your Raspberry Pi, the router needs to know where to send it. Port forwarding tells the router to direct incoming requests on a specific "port" (like a numbered door) to your Raspberry Pi's internal IP address and its SSH port (which is usually 22).
This process varies a bit depending on your router's brand and model, but the general idea is the same. You'll log into your router's settings (usually by typing its IP address into a web browser), find the "Port Forwarding" or "NAT" section, and create a new rule. You'll specify the external port (often 22, but you can choose a different one for a bit more obscurity), the internal IP address of your Raspberry Pi, and the internal port (22). It's a crucial step for outside access, and while it requires a little setup, it's very doable, so that's a key part of the process.
Dynamic DNS for Easy Access
Your home's external IP address, the one your internet service provider gives you, can sometimes change, you know. This is called a "dynamic IP address." If it changes, your port forwarding setup might stop working because the external address you're trying to connect to is no longer valid. This is where Dynamic DNS, or DDNS, comes in handy. DDNS services let you link a memorable hostname (like `my-pi-project.ddns.net`) to your ever-changing home IP address.
There are several free DDNS providers available, which is really good news. You sign up for an account, pick a hostname, and then often install a small program on your Raspberry Pi or configure your router to update the DDNS service whenever your home IP address changes. This way, you can always connect to your Pi using that easy-to-remember hostname, no matter what your home's current external IP address is. It makes remote access much more reliable and convenient, and it's another free tool that helps you realize your full potential through the power of computing, like the Raspberry Pi Foundation aims to do.
For more detailed instructions on setting up your Raspberry Pi, you can always check out the official documentation from the Raspberry Pi Foundation. They have a lot of great resources there, which is very helpful for anyone getting started or wanting to learn more about their little computer, so it's a good place to look for information.
Common Questions About Raspberry Pi Remote Access
People often have a few questions when they start thinking about connecting to their Raspberry Pi from afar, you know. Here are some common ones that come up, along with simple answers to help you out, which is pretty much what this guide is all about.
How do I enable SSH on Raspberry Pi?
You can enable SSH on your Raspberry Pi in a few ways, as a matter of fact. The easiest method for new setups is using the Raspberry Pi Imager's advanced options (Ctrl+Shift+X) before writing the OS to your SD card. You just tick a box there. If your Pi is already running, you can open the Raspberry Pi Configuration tool (under Preferences in the desktop environment), go to the Interfaces tab, and simply turn SSH on. Or, if you prefer, you can create an empty file named `ssh` (no extension) in the boot folder of your SD card after flashing the OS, and your Pi will enable SSH when it starts up, which is pretty clever.
Is SSH secure for remote access?
Yes, SSH is considered very secure for remote access, you know. It uses strong encryption to scramble all the data that goes between your computer and your Raspberry Pi, so it's very hard for others to snoop on your connection. However, to keep it truly secure, it's very important to change your Pi's default password (`raspberry`) to a strong, unique one. For even better protection, you should consider setting up SSH keys, which add an extra layer of verification and make it much harder for unauthorized people to get in. So, while it's secure, a little effort on your part makes it even more so, which is good practice.
Can I access my Raspberry Pi from outside my home network for free?
Absolutely, you can access your Raspberry Pi from outside your home network for free, you know. The main steps involve setting up "port forwarding" on your home router, which tells your router to send incoming SSH requests from the internet to your Raspberry Pi. Additionally, using a "Dynamic DNS" (DDNS) service, many of which are free, can help you keep track of your home's external IP address, even if it changes. This way, you can always connect to your Pi using an easy-to-remember hostname, no matter where you are, which is pretty convenient for remote control.
We hope this information helps you get your Raspberry Pi set up for free remote access. You can learn more about Raspberry Pi projects on our site, and if you're interested in digital skills, you might want to check out our page on coding for beginners. Being able to access your Pi remotely really helps with learning and building, and it's a great way to use your little computer to its fullest, which is what it's all about, really.


Detail Author:
- Name : Gerhard Gerlach Sr.
- Username : dagmar54
- Email : bauch.esteban@kuphal.com
- Birthdate : 1990-01-12
- Address : 4473 Pollich Points North Price, NM 57605
- Phone : +1-325-550-8197
- Company : Cartwright-Hegmann
- Job : Architecture Teacher
- Bio : Veniam minus debitis sed tempora. Vel in voluptates impedit tempore. Facilis numquam et in quod. Perferendis laudantium est distinctio voluptatum.
Socials
facebook:
- url : https://facebook.com/schaeferk
- username : schaeferk
- bio : Nihil ab alias id quibusdam ut qui. Omnis ut omnis non eius error.
- followers : 5920
- following : 776
tiktok:
- url : https://tiktok.com/@kenny9350
- username : kenny9350
- bio : Aut in non sint est aspernatur.
- followers : 4914
- following : 682
