
Imagine your Raspberry Pi, quietly doing its work, perhaps monitoring your home, running a little server, or handling some cool automation. What if you need to check on it, change a setting, or even start a new project, but you are not right there with it? This is where learning how to remotely control a Raspberry Pi becomes a very helpful skill, a real game-changer for anyone with one of these neat little computers.
Think about it, you might be out and about, maybe enjoying a cup of coffee at a cafe, or perhaps you are just in another room, and you want to get to your Pi. Connecting a screen, keyboard, and mouse every single time can be a bit of a bother, can't it? That whole idea of "remotely" means you can connect to your Pi from a distance, without needing to be physically present, which is quite liberating, so it is.
Just like how many folks today find careers where they can work remotely from anywhere, giving up the daily commute and doing what they love, you too can give your Raspberry Pi that same freedom. You can truly manage your projects, check on things, and even start new tasks on your Pi, daily, from anywhere you choose. This guide will show you how to set up that connection, making your Pi even more versatile, as a matter of fact.
Table of Contents
- Why Remote Control Your Raspberry Pi?
- Before You Begin: Prepping Your Pi
- Method 1: SSH - The Command-Line Hero
- Method 2: VNC - For a Visual Desktop
- Method 3: Web-Based Interfaces and Services
- Securing Your Remote Connection
- Common Questions About Remote Pi Access
- Bringing It All Together
Why Remote Control Your Raspberry Pi?
The main reason to control your Raspberry Pi from afar is, well, convenience, isn't it? You might have your Pi tucked away in a cupboard, perhaps hooked up to a security camera, or running some smart home gadgets. You certainly don't want to pull it out and connect a screen every time you need to make a small adjustment, or so it seems.
This ability to access your Pi remotely means you can keep it in its optimal spot, working away, while you manage it from your laptop, tablet, or even your phone. It is very much about flexibility, allowing your projects to truly live anywhere, without being tied down by physical access, kind of like finding a remote career where you can work from home, or really, from anywhere, which is pretty neat.
Before You Begin: Prepping Your Pi
Before you jump into controlling your Pi from a distance, there are a few initial steps to take to make sure everything runs smoothly. These are pretty simple things, but they make a big difference, you know.
Update Your Pi's Software
Keeping your Raspberry Pi's operating system and software up to date is always a good idea, as a matter of fact. It helps with security and makes sure everything works as it should. You can do this by opening a terminal on your Pi and typing a couple of commands.
First, you will want to get the latest package lists. Just type `sudo apt update` and press Enter. This command, you know, refreshes the list of available software.
Then, to upgrade all your installed packages to their newest versions, you can type `sudo apt full-upgrade` and press Enter. This might take a little while, but it is very important for a healthy system, to be honest.
Find Your Pi's IP Address
To connect to your Pi remotely, you need to know its address on your network, which is its IP address. It is kind of like knowing a house number before you can visit, right?
You can find this by opening a terminal on your Raspberry Pi and typing `hostname -I` (that is a capital 'i'). This command, you know, usually shows you the IP address assigned to your Pi on your local network. Make a note of it, as you will need it soon.
Method 1: SSH - The Command-Line Hero
SSH, or Secure Shell, is probably the most common way to control your Raspberry Pi remotely, especially if you are comfortable with text commands. It is very powerful and secure, allowing you to run commands as if you were sitting right in front of your Pi, typing directly into its terminal, which is quite handy.
Enabling SSH on Your Pi
By default, SSH might not be turned on, especially with newer Raspberry Pi OS versions. You can enable it pretty easily, though.
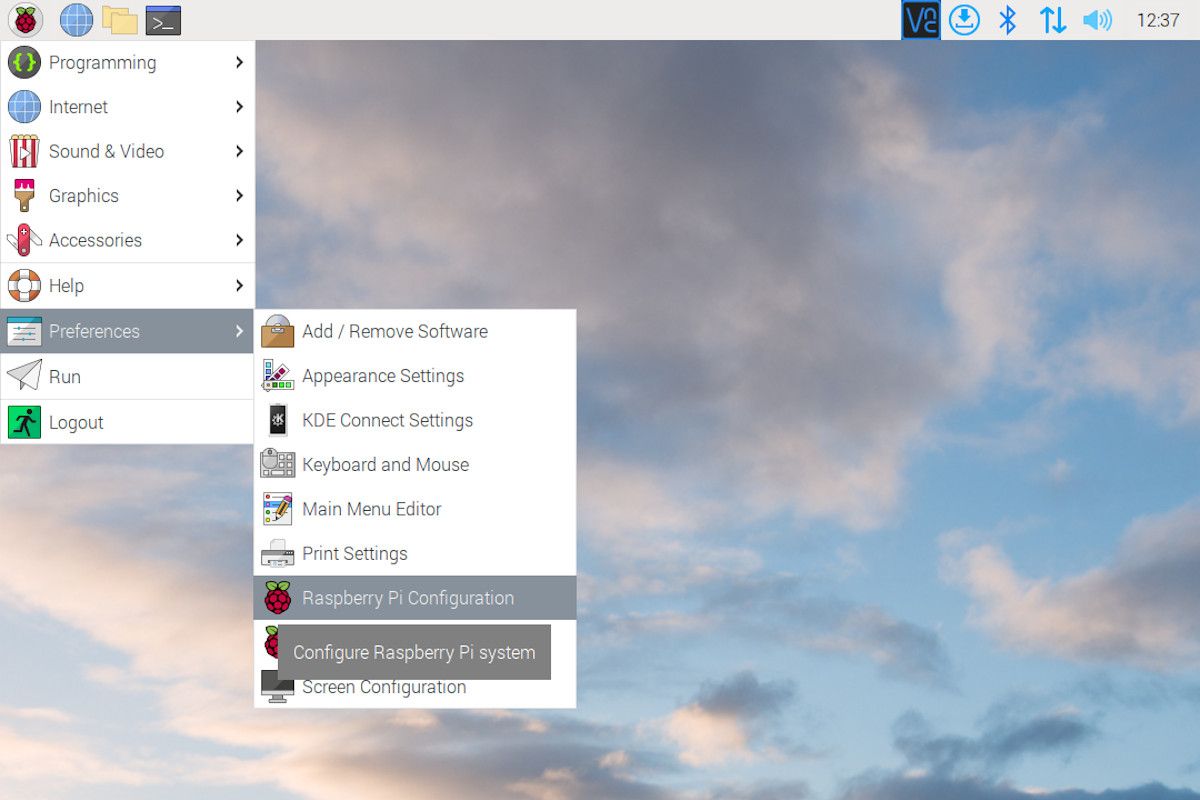
One way is to use the Raspberry Pi Configuration tool. Go to the main menu on your Pi's desktop, find "Preferences," and then click "Raspberry Pi Configuration." Inside that window, look for the "Interfaces" tab, and you should see an option for "SSH." Just make sure it is enabled, and then click "OK."
Alternatively, you can enable SSH directly from the command line on your Pi. Just type `sudo raspi-config` and press Enter. This brings up a text-based menu. Navigate down to "Interface Options," then select "SSH," and choose "Yes" to enable it. After that, pick "Finish" and restart your Pi if it asks you to, you know.
Connecting via SSH from Another Computer
Once SSH is enabled on your Pi, you can connect to it from almost any other computer on the same network. This is where that IP address you found earlier comes in handy, actually.
If you are using a Linux or macOS computer, open your terminal application. If you are on Windows, you can use PowerShell or Command Prompt, or a tool like PuTTY if you prefer. Then, you will type a command that looks something like this:
ssh pi@YOUR_PI_IP_ADDRESSReplace `YOUR_PI_IP_ADDRESS` with the actual IP address you noted down. The `pi` part is the default username for Raspberry Pi OS. When you connect for the first time, it might ask you to confirm the connection; just type `yes` and press Enter.
Then, it will ask for your password. The default password is `raspberry` unless you have changed it. Type it in (you won't see anything as you type, for security reasons) and press Enter. If everything works, you will see the Pi's command prompt, and you are in! You are now controlling your Pi remotely, just like that, more or less.
SSH Outside Your Home Network
Connecting to your Pi via SSH when you are not on your home network is a bit more involved, but it is certainly possible. This usually means setting up something called "port forwarding" on your home router. It is like telling your router to send specific incoming connections to your Pi, so it is.
You will need to log into your router's settings (usually by typing its IP address into a web browser). Look for sections like "Port Forwarding," "NAT," or "Virtual Servers." You will want to forward port 22 (the default SSH port) to your Raspberry Pi's local IP address. This step can vary a lot depending on your router's brand and model, so you might need to check your router's manual or search online for specific instructions for your router, actually.
A more secure and often simpler method for accessing your Pi from outside your home network is to use a VPN (Virtual Private Network) or a service like Tailscale. These create a secure tunnel to your home network, letting you connect to your Pi as if you were right there, without exposing ports directly to the internet, which is generally a safer approach, very much so.
Method 2: VNC - For a Visual Desktop
If you prefer a graphical interface and want to see your Raspberry Pi's desktop environment just as if you were sitting in front of it, VNC (Virtual Network Computing) is the way to go. It is really good for tasks that need a mouse and keyboard interaction, or when you just want to see what is happening visually, you know.
Installing VNC Server on Your Pi
First, you need to install a VNC server on your Raspberry Pi. RealVNC Connect is a popular choice and often comes pre-installed or is easy to add.
You can enable VNC in the same way you enabled SSH: go to "Raspberry Pi Configuration" under "Preferences" in the main menu, then click the "Interfaces" tab, and make sure "VNC" is enabled. If it is not installed, the system might prompt you to install it, or you can install it manually via the terminal by typing `sudo apt install realvnc-vnc-server`.
Once enabled, the VNC server will start running on your Pi. It is a very simple process, really.
Setting Up VNC Viewer on Your Computer
To connect to your Pi's VNC server, you will need a VNC client, often called a VNC viewer, on the computer you are connecting from. RealVNC also offers a free VNC Viewer application for Windows, macOS, Linux, and even mobile devices. You can download it from their official website.
Install the VNC Viewer on your computer or device. It is a pretty straightforward installation process, just like installing any other application, in a way.
Connecting with VNC
Open the VNC Viewer application on your computer. You will usually see a field where you can enter the IP address of your Raspberry Pi. Type in the IP address you found earlier (the same one you used for SSH) and press Enter or click "Connect."
The VNC Viewer will then ask for your Raspberry Pi's username and password. Again, the default is `pi` and `raspberry` unless you have changed them. Enter these details, and if everything is correct, you should see your Raspberry Pi's desktop appear on your screen! You can now use your mouse and keyboard to control it just as if it were right in front of you, which is quite cool, honestly.
Method 3: Web-Based Interfaces and Services
For certain tasks or specific applications, you might find web-based interfaces to be a very convenient way to control your Raspberry Pi. These often let you manage specific functions or even automate things through a web browser, which is very accessible, you know.
These methods are especially useful if you are looking to create a system where you can, say, manage your smart home devices or monitor sensors from anywhere, just like someone might use a remote job board to find a career where they can work from anywhere, finding their next remote career with advanced job search options.
Using Node-RED for Automation
Node-RED is a flow-based programming tool that is incredibly popular on the Raspberry Pi for automating tasks and connecting different devices. It provides a web-based interface where you can drag and drop "nodes" to create complex workflows, and it is pretty easy to use, too.
If Node-RED is not already installed on your Pi, you can install it by running `bash <(curl -sL https://raw.githubusercontent.com/node-red/node-red-installer/master/bin/update-nodejs-and-nodered)` in your terminal. After installation, you can start it with `node-red-start` and access its web interface by typing `YOUR_PI_IP_ADDRESS:1880` into your web browser. This gives you a powerful way to control and automate things on your Pi without needing to touch the command line, which is quite nice.
Other Web-Based Tools
There are many other web-based tools and services you can install on your Pi, depending on what you want to do. For instance, if you are running a media server, Plex or Jellyfin might offer web interfaces. If you are managing files, tools like FileBrowser provide a web-based file manager. Each of these tools, you know, gives you a different way to interact with your Pi from afar, through a simple web browser.
Setting these up usually involves installing the software on your Pi and then accessing a specific port on your Pi's IP address from your web browser, very much like how you would access Node-RED. This makes managing specific applications on your Pi very straightforward, even when you are not physically near it.
Securing Your Remote Connection
When you open up your Raspberry Pi to remote access, it is really important to think about security. You want to make sure only you can get to it, right?
Here are a few tips to keep your Pi safe:
- Change Default Passwords: The very first thing you should do is change the default `pi` user password from `raspberry` to something strong and unique. You can do this by typing `passwd` in the Pi's terminal and following the prompts. This is perhaps the most important step, honestly.
- Use SSH Keys: For SSH connections, consider using SSH keys instead of passwords. This is a more secure method where you use a pair of cryptographic keys for authentication. It is a bit more setup initially, but it is much safer, you know.
- Firewall Rules: Configure a firewall on your Pi (like UFW) to only allow connections on the ports you absolutely need (e.g., port 22 for SSH, port 5900 for VNC). This helps block unwanted access, which is pretty sensible.
- Regular Updates: Keep your Pi's software updated, as mentioned earlier. Updates often include security fixes that protect your system from new threats, so they are very important.
- Avoid Port Forwarding if Possible: As discussed, if you need to access your Pi from outside your home network, using a VPN or services like Tailscale is generally safer than direct port forwarding. These methods create a secure tunnel, reducing the risk of exposing your Pi to potential attackers, which is a much better way to go, apparently.
Common Questions About Remote Pi Access
People often ask a few things when they start thinking about controlling their Raspberry Pi from a distance. Here are some common ones:
Can I control my Raspberry Pi from my phone?
Yes, you certainly can! For SSH, there are many terminal emulator apps available for both Android and iOS that let you connect to your Pi. For VNC, RealVNC offers mobile viewer apps that work very well, letting you see and interact with your Pi's desktop right from your phone or tablet. It is very convenient for quick checks, you know.
What is the easiest way to remotely access Raspberry Pi?
For simple command-line tasks, SSH is usually the easiest once it is set up. It is built into most operating systems and is very lightweight. If you need a graphical interface, VNC is probably the easiest way to get a full desktop experience. For beginners, VNC might feel more familiar because it is visual, so it might be a good starting point.
How do I make my Raspberry Pi accessible from outside my home network?
Making your Pi accessible from outside your home network typically involves either setting up port forwarding on your router (which needs careful security considerations) or using a VPN service. Services like Tailscale or ZeroTier are also popular choices as they create secure connections without needing complex router configurations. They are often simpler and more secure for accessing your Pi from anywhere, which is quite useful, honestly.
Bringing It All Together
Being able to control your Raspberry Pi remotely really opens up a lot of possibilities for your projects. Whether you are using SSH for command-line tasks, VNC for a full desktop experience, or web-based tools for specific applications, the freedom to manage your Pi from anywhere is a significant advantage. Just like finding a remote career means you can work from anywhere, managing your Pi remotely means your projects can live and run without needing your constant physical presence, which is very empowering, isn't it?
The meaning of remotely, to a remote extent, perfectly describes what you achieve here: managing your little computer from a distance. This capability lets you really explore what your Raspberry Pi can do, without being tied down. Learn more about Raspberry Pi projects on our site, and link to this page for more remote setup tips.


Detail Author:
- Name : Miss Eldora Schamberger II
- Username : snikolaus
- Email : zella.koch@thiel.com
- Birthdate : 1997-11-30
- Address : 42879 Alba Fork Koeppview, IA 93773-5858
- Phone : (541) 283-4298
- Company : Heidenreich-Kohler
- Job : Highway Maintenance Worker
- Bio : Consequatur doloremque tenetur cumque ea. Laborum voluptates officia iusto dolorum totam culpa. Molestias sunt excepturi optio deserunt animi excepturi.
Socials
linkedin:
- url : https://linkedin.com/in/vicentebernhard
- username : vicentebernhard
- bio : Rerum sunt nobis non sunt ipsum illum.
- followers : 4553
- following : 1438
twitter:
- url : https://twitter.com/bernhard2015
- username : bernhard2015
- bio : Minima molestias enim eum impedit. Aperiam quo et quia. Cum illum ut eveniet officiis ducimus enim.
- followers : 1642
- following : 343
instagram:
- url : https://instagram.com/vicente_xx
- username : vicente_xx
- bio : Quod cum explicabo sed. Magni temporibus sapiente aut.
- followers : 1622
- following : 2061
